
Three ready positions every defensive pistol owner should know
News flash: competent gun handling is equally or more important than good marksmanship. The person who can draw with efficiency of motion, and handle any malfunctions or reloads with the instinctive action that comes with good practice, is likely to prevail in competition or in a gunfight. Paying attention to how you hold the gun matters.
This article covers three so-called ready positions that serve to keep shooters and those around them safe, as well as keeping the firearm poised for quick deployment.
The names of ready positions used here are arbitrary; they’re the ones I use. Other instructors may call them other names. What’s important is knowing how and when to use each They’re presented here in the order that they’d be used in situations ranging from relaxed to high intensity, with the understanding that context may dictate otherwise.
In theseready positions, the trigger finger should be kept straight and planted on the frame of the pistol.
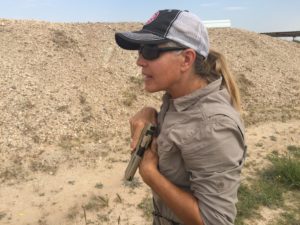
- Low Ready
With both hands on the gun in a firing grip, (see trigger finger advisory above), simply rest the upper arms on the chest. This is a relaxed position from which the gun can still be brought into action relatively fast.
In low ready, the muzzle is pointed somewhere between the ground just in front of the gun handler’s feet to ground level up to approximately seven yards away. This is
Low ready is first ready position I teach brand-new shooters. It precludes the possibility of that most common of shooting injuries, a round through the foot. With both hands on the gun, the shooter’s mind is better focused on the firearm and the lower limbs stay in the clear. It’s also a no-strain position in which to take a break.
In a defensive encounter, low ready is often preferable in situations that are currently calm but could become volatile in a hurry. For example, if a perpetrator surrenders in place or appears to be incapacitated by injury, low ready signals the innocent person’s intent to stop any new violence from that perp, as well as being ready for action as compared to being re-holstered. It signals that intent not only to the perp, but perhaps to police who may be unseen at first as they arrive on scene (no guarantees on the perceptivity of local gendarmes, which varies widely by community). Compared to the amateurish muzzle-up, “Charlie’s Angels” ready position, low ready sends a non-verbal message of competence and civility. It also keeps bystanders safer if the gun handler has poor trigger finger discipline, and prevents wanton muzzling of others when the gun is re-holstered or placed on the ground upon arrival of law enforcement in the aftermath of an incident that inspired drawing the gun in the first place.
- Compressed Ready
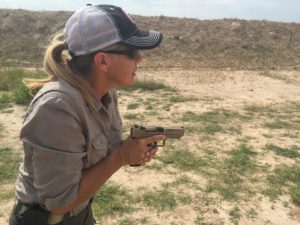
Maintaining the firing grip and keeping the muzzle pointed in the direction of the target or threat, bend the elbows and draw the gun near the chest. Keep elbows resting against the sides of the body.
This position is comparatively faster than low ready in terms of re-acquiring a sight picture. It is truly a “ready” posture in that firing can be done from there if the attacker closes distance quickly to within bad-breath distance. Malfunctions in a semiauto are entirely possible in such a scenario, unless the wrists are firmly locked and the gun is far enough away from the shooter’s torso to allow the slide to cycle completely.
I have come to employ compressed ready as part of my search-and-assess technique at the end of every shot string. It allows me to scan 360 degrees while knowing the gun is secure at my chest and at less risk of being grabbed in a real-world setting.
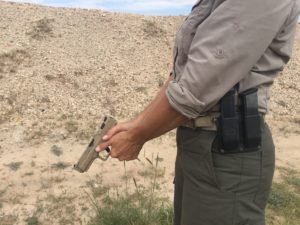
- Sul Position
Sul, pronounced like “pool” with an s, means “south” in Portuguese. That’s useful to know inasmuch as it’s a reminder of where the muzzle should be pointing when this ready position is used—straight down.
Getting into sul is done by rotating the support thumb against the firing hand thumb as the elbows bend and draw the handgun to the chest. Some operators put it against the abdomen. It really doesn’t matter; I prefer the chest as this is my go-to position for being ready to deploy the gun at a moment’s notice, and the motion required to do that from the chest is minimal.
This is the only position here in which firing grip is broken to be in the ready position. In sul, the support hand rests against the body while the firing hand maintains a firing grip, with the wrist angled so the muzzle points straight down.
The most common mistakes in sul are not pointing the muzzle straight down, which results in muzzling one’s own knee or foot. The other is sticking the elbows out, which forms an attention-drawing atypical profile and can invite theft of the gun from behind. Elbows should rest against the sides.
Sul is a great skill for anyone who carries a gun for public or self-protection. It keeps the muzzle in a safe direction, keeps the gun as secure and theft-resistant as possible when in hand, is discreet and less detectable in environments where the sight of a gun could cause new problems. It’s also extremely fast to go from sul to firing position with a little practice.
Make these ready positions part of your skill set. You will be safer and more competent, on the range and off. As always, the rules of firearm safety apply here, and neither Lucas Oil nor I bear responsibility for any unintended outcomes of your practice.
ABOUT THE AUTHOR
Eve Flanigan is a defensive shooting and lifestyle student, practitioner, and instructor based in the American Southwest. Flanigan holds numerous NRA Instructor certifications and is licensed to instruct New Mexico’s intensive Concealed Carry course. She regularly designs, conducts, and co-teaches classes on concealed carry, introduction to pistol, defensive pistol, basic rifle, last-ditch medical, and use of force for civilian students. Flanigan enjoys competing in run-and-gun biathlons that include carbine and pistol.